Python script
Your weather station can use two different temperature sensors. This tutorial covers the software part for each of those pieces of equipment. Which one you decide to use is totally up to you. To help you decide, refer to this page. Each of those sensors uses different type of python or even C code to get the readings. Both of them store the results in the database in pretty much the same way. Generally speaking, the code works as follows. In the first run, it creates a new table in the WordPressDB table. Afterwards, the temperatures are read and stored in the table named temperatures. With setting up a cronjob, this process is repeated every 30 minutes. This way you get a nice overview of the temperatures during the day.
To use the python script (which ever sensor you want to be using) you will need to install a few things –apt-get install python python-dev libmariadb-dev build-essential python-openssl. You will need to install easy_install which will help you install python modules without any problems. Do that with sudo apt-get install python-setuptools . Now you have to update easy_install with easy_install -U distribute. After that, you can install the module that will take care of saving read information to your database. Type in easy_install MySQL-python. This module will take care of saving the data in the database. It is essential that you install it, otherwise the script does not start at all.
Code for DHT22
You will be using a combination of python and C code. The latter reads the values from the DHT22 sensor and serves it to python. Sometimes it takes a few tries (one or two maximum) before the values are read. After that, python saves these values to the database WordPressDB in the temperatures table. When the script is run for the first time, this table is automatically created. At the end of this tutorial, you will be able to get the very first reading from your weather station. It will look something like the picture below.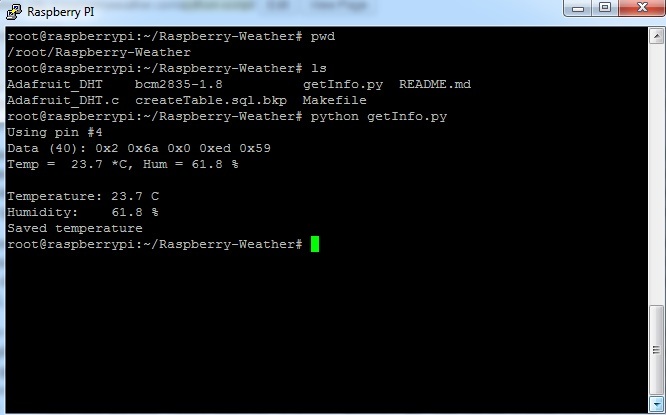
Now you can download the python script from github.com with git clone https://github.com/peterkodermac/Raspberry-Weather.git. Download the code to the root directory. You can choose another location, but you will need to change the crontab accordingly. More on that later. You will be presented with a folder named Raspberry-Weather. Take a look inside, you will see several files and a few folders. In the production folder, you can see getInfo.py. It basically creates the needed table when run for the first time. Afterward, it tries to get temperature and humidity reading. In some cases, it takes a few tries, but you do not need to worry about that – the script does everything for you.
git clone https://github.com/adafruit/Adafruit_Python_DHT.git. Go to the newly created directory with cd Adafruit_Python_DHT. Install the library with sudo python setup.py install. If everything is wired correctly, test it out with sudo ./AdafruitDHT.py 22 4. Two parameters are issued, 22 is for DHT22 and 4 is for pin #4.
We will need to modify the script so it can access your database. Use the nano text editor in the Raspberry-Weather – nano /root/Raspberry-Weather/production/getInfo.py. In the top of the script, there are a few variables that hold database name, username and password. Modify them so they contain the values you had entered while installing. You can double check them by logging into MySQL. If you named your WordPress database something other than WordPressDB, use the same name in this line. Also, change the sensor and pinNum variables if you’re not using DHT22 and pin number 4.
Install all the required packages with sudo apt-get install build-essential python-dev python-openssl. These packages will be used when you cd Raspberry-Weather and sudo python setup.py install. The setup.py script installs the required drivers that enable you to get temperature and humidity readings. Move with cd production and give it a go. Remember to use sudo – sudo python getInfo.py. If all goes well you should see temperature and humidity printed out. If you get an error, issue the command git clone https://github.com/peterkodermac/Raspberry-Weather.git -b testing . This is a testing branch which has not yet been fully tested. In this folder, repeat sudo python setup.py install, cd production and lastly sudo python getInfo.py.
You should take a peek at the temperatures table with MySQL. It should contain at least one reading. Do that by typing mysql -u root -p and then type in your mysql password. Type in show databases; which will display all databases, select the WordPress database. In my case it is named WordPressDB, I can select it with use WordPressDB;. The table that stores all the readings is named temperatures. Display everything in it with select * from temperatures;. It should display all the readings taken.
Code for DS18B20
The process for getting and setting up the code is much simpler than the one above. Get the code withgit clone https://github.com/peterkodermac/Raspberry-Weather-DS18B20.git. You should end up with a folder Raspberry-Weather-DS18B20 that contains two files. Edit the main script with nano getInfo.py. Edit the two global variables that contain the username and password. Afterwards, just try it out with python getInfo.py. You should be presented with a message “Saved temperature”. Recheck that the temperatures are really saved using the phpMyAdmin.

Set up the cronjob
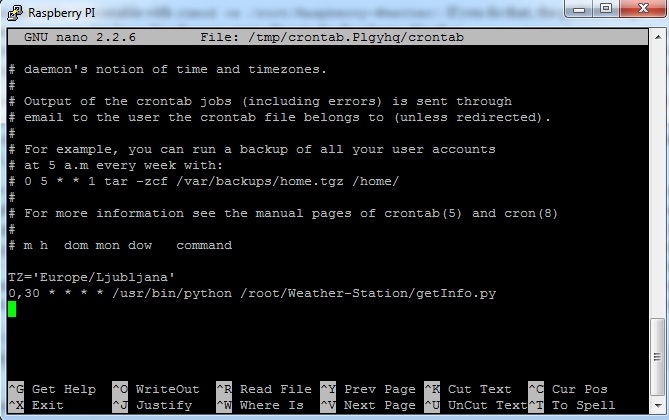
Now we have to make sure, that this script is run every 30 minutes. This is done via crontab, but we have to get your timezone first. In case you forgot to set it in the initial Raspberry Pi setup, you can do that now. Otherwise, you will only copy the timezone. Type in tzselect and choose your location. After typing in your location details, you will get some information about your timezone. The most important part you need to copy is something like this TZ=’Europe/Ljubljana’ . Open up crontab by typing in crontab -e . go to the bottom and paste in your timezone. The correct timezone is needed in order to calculate the times correctly later on.
If you’re planning on using DHT22 then add a new line and type in 0,30 * * * * /usr/bin/python /root/Raspberry-Weather/production/getInfo.py . This will tell crontab to run the script located in /root/Raspberry-Weather/getInfo.py every 30 minutes. If your code is located in some other place (ie /home/pi/) change the path accordingly. For those of you with DS18B20, the line should have 0,30 * * * * /usr/bin/python /root/Raspberry-Weather-DS18B20/getInfo.py. If you want to try it out without waiting, temporarily replace 0,30 with *. This will run the script every minute. If you run into trouble, make sure you have put the right path to the getInfo.py! To check if the values are really saved every 30 minutes use phpMyAdmin and look in WordPressDB and then in temperatures table.